
Screenshots are an effective tool for recording and sharing memorable events, information, or anything else on your Windows 10 or Windows 11 laptop. Knowing how to screenshots in various ways can be a game changer in your digital toolset. In this post, we’ll look at five easy and different ways of how to take screenshots on Windows 10 and Windows 11

1.PrtScn (Print Screen) Key:
Windows 10 and Windows 11:
- The “PrtScn” key is a useful tool for taking screenshots in both Windows 10 and Windows 11.
- Pressing the “PrtScn” key, the full screen is captured and copied to the clipboard.
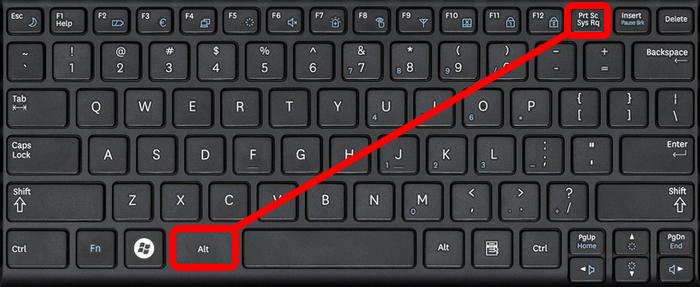
- To capture only the active window, use “Alt + PrtScn.”
- Once the screenshot has been recorded, open an image editing program (such as Paint or Photoshop) and paste it using “Ctrl + V.”
- The snapshot can then be edited, saved, or shared as needed.
2. Snipping Tool:
Windows 10:
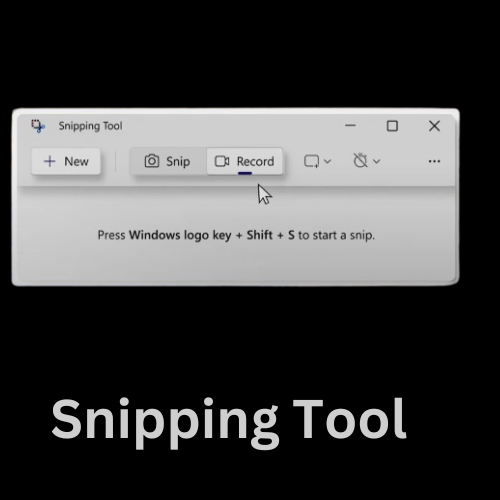
- The Snipping Tool is a built-in screenshot application that allows you to manipulate the capture area with greater precision.
- From the Start menu, launch the Snipping Tool.
- Click “New” and then choose the region you wish to capture.
- The screenshot is opened in the Snipping Tool window, where you may annotate, highlight, or save it.
3. Snip & Sketch:
Windows 10 and Windows 11:
- A more feature-rich version of the Snipping Tool is called Snip & Sketch.
- To launch Snip & Sketch, press “Win + Shift + S.”
- Select from the following snipping modes: Fullscreen, Window, Freeform, or Rectangular.
- After transferring the screenshot to your clipboard, you may annotate it using the Snip & Sketch interface.
4. Windows + Print Screen:
Windows 10 and Windows 11:
- This technique takes a screenshot of the whole screen and saves it as a file.
- Once you hit “Windows + PrtScn,” a momentary screen dimming will show that a screenshot has been taken.
- The screenshot is stored as a file in the “Pictures” library’s “Screenshots” folder.
5. Snipping Tool and Snip & Sketch Shortcut:
Windows 10:
- Press “Windows + Shift + S” to open Snip & Sketch without first using the Snipping Tool.
- When you choose snipping mode, the snapshot is copied to your clipboard.
- This shortcut allows you to start snipping without opening the complete Snipping Tool or Snip & Sketch programs.
Tips for Success: Take Screenshots on Windows 10 and Windows 11
Editing Screenshots:
Use built-in tools or third-party applications for basic editing, such as cropping or adding annotations.
Clipboard Magic:
Screenshots taken with the “PrtScn” key or Snip & Sketch are transferred to the clipboard and may be easily pasted into other programs.
Organize with Folders:
Create a dedicated folder for your screenshots to keep them organized and easily accessible.
Share with Ease:
Use Snip & Sketch’s screenshot-sharing capabilities to send screenshots to colleagues or close friends.
Conclusion:
Mastering the art of taking screenshots on Windows 10 and Windows 11 opens up a world of communication, documentation, and creative opportunities. These solutions cater to varied tastes and circumstances, whether you like the conventional “PrtScn” key or the more feature-rich Snip & Sketch.