
People usually ask how to take screenshot on a mac when they are new to the Mac. Since there isn’t a Print Screen key, you’ll be excused if it isn’t immediately apparent. You just forgot the keyboard shortcut or want to delve deeply into the top screenshot programs on the market. We’ve got ye. There are many choices and possibilities, so there is much to explore. Here is all the information you need about for how to take screenshot on mac.

How to take a screenshot on Mac by using keyboard shortcuts
Keyboard shortcuts are the best way to take screenshots on MacOS, whether you want to capture the whole screen or just a part. Apple’s techniques save screenshots to the desktop by default, but you may use a keyboard shortcut to copy the screenshot to the clipboard instead.
Capture a screenshot of the full screen
Just do these things on your Mac to take a picture:
- Hold down Shift, Command, and 3.
- If an image of a picture shows up in the corner of your screen, click it to change it. You could also wait until the shot is saved on your desktop.
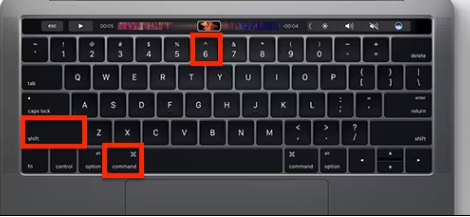
How to take screenshots on mac by using the Touch Bar

Does your Mac have the touch bar if you still need the Windows-style print screen button? If so, you may designate a button just for screenshots! This is how it goes:
- Select “System Preferences” > “Keyboard” from the Apple menu. Select “System Preferences” > “Keyboard” from the Apple menu.
Click Customize Control Strip in step two

Drag & drop the screenshot button to the desired area on the Touch Bar, then save the adjustments
You can now use only your Touch Bar to take a picture of your Mac’s screen. The screenshot button will bring up a choice where you can choose to take a picture. If you wish to modify the location where your screenshots are saved, click “Save To.” Select whether you want to record the whole screen, a specific region, or a window. Move your cursor after that to snap a screenshot.
How to take screenshot on Mac with the built-in screenshot menu (free but limited)
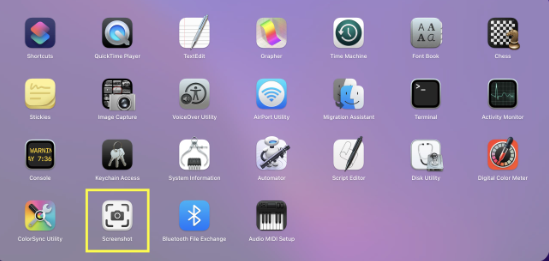
Apple computers running macOS Mojave or later have a built-in tool for taking screenshots. It lets Mac users quickly take pictures and record what’s on their screen. That means that if you use Mojave, Catalina, Big Sur, or Monterey, it’s easy to get to the built-in screenshot menu and start taking pictures. Follow the steps below.
Press “Command + Shift + 5” on your computer to get to the picture menu.
Step 2: The picture menu will appear at the bottom of the screen. You can take a picture of the whole screen, a specific window, or a particular place on your Mac.
Step 3: Pick the method you want to take the picture. When you pick a window or area, the mouse will turn into a crosshair. Drag and click the crosshair to pick out the place you want to save.
Step 4: When you’ve found the place you want to record, let go of the mouse button. The picture will be saved and show up at the bottom right of the screen for a short time. Click on it to make more changes, or leave it alone. It will then be saved to your desktop.
Where to find screenshots on Mac
You took the picture, but now you might need help finding it. By default, your images are saved to your desktop. You can access the desktop directly or through Finder by going to Desktop. But that can make your screen look very sloppy. If you have macOS Mojave or later, you can change where pictures are saved by default in the Screenshot app.
Once you save a picture, it will automatically save as a PNG file. Open up Terminal to change this. In the command prompt, type “defaults write com.apple. screen capture type” without quotation marks. Then, type the format you want, such as JPG, PDF, or another picture format. Last, press the Return key.