Everyone asked about, How to Remove Popsocket? Popsockets are just one of the various new goods that have become popular, and there is an excellent explanation for this. If you have one of these, you already know just how enjoyable it is to use it. After it has been fastened to the device you are using, a popsocket’s top could be adjusted by pushing it in and drawing it out of its sockets.

You could nevertheless decide at some point that you want to take Remove Popsocket and adhere it to a different location. This is a fairly simple thing to do. Simply run your fingertips beneath the base, then give it a gentle pull in the opposite direction.
2 Easy Steps of How to Remove Popsocket?
Part 1: Removing the Popsocket
- If the popsocket has been inflated, the cap should have its top pushed down. If the Popsocket is still inflated when you try to delete it from your device, you won’t be able to. Throughout the procedure of Remove popsocket, there is a risk that it will become detached from its base.
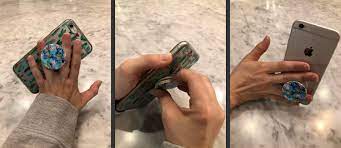
- Work the tips of your nails beneath the bottom of the popsocket until you find a gap. Put some pressure on the outer edges of the popsocket’s base with your fingernails, and then push downward until one can feel the nails sliding below.
- You don’t need to use a lot of force; sufficient pressure so that you can get a firm hold on the popsocket will do. It ought to be possible for you to feel the ground of the Popsocket sliding away from the cell device at this point. If you can’t get your fingernails down the surface of your popsocket, try sliding a few Centimetres of floss from your tooth under there instead.
- Remove popsocket from your phone by carefully pulling it off. While you are pulling, only lightly grasp the popsocket. To remove the popsocket, go carefully and slowly during the process. You can try to remove the popsocket by peeling it off, beginning at one side and pushing towards the other.
Part 2: Cleaning and Reattaching Popsockets
- Place the bottom portion of the popsocket in a bowl of ice water and let it soak for three seconds. Because your Popsocket is small and has a high level of stickiness to begin with, you won’t need a substantial amount of water to wash it and make it more sticky again. If there is an excessive amount of water, its drying process could be extended above the 15-minute limit, which would compromise its ability to adhere.
- Give the Popsocket approximately ten minutes to dry out. You should let your popsocket dry gradually by placing it outside in the open air. Place it so that the sticky aspect is facing up on a piece of paper or a cotton towel.
- It is best to keep your Popsocket in its packaging for no more than 15 minutes at a time. In the event that this does not occur, it will lose its ability to adhere. If, after 10 minutes, your Popsocket is not dry, clean the bottom of it carefully with a towel made from paper.
- Adhere the Remove Popsocket to the backside of the cell phone or a similar surface that is flat. Any surface that is tidy and level will do. Keep in mind, nevertheless, that a Remove popsocket may not adhere to materials that are made from leather or silicone, in addition to surfaces that are waterproof. A Popsocket works best when attached to reflective surfaces, such as windows, as well as tablets and smartphones.
- Before extending or shutting your popsocket, give it a rest for approximately one hour first. This will give it ample opportunity to fully cling to the device again once it has fully adhered to your phone.